Sunday, July 29, 2012

She's My Baby

Good Morning! I wanted to share with you a design I made using Authentique's sketch challenge for July. It's a great sketch with three primary photos, a banner and a few butterflies. You can see that sketch here.

I used Authentique's Carefree collection to create this layout for TSF design team member Ann's Olympic challenge. Ann challenged us to honour Sir Paul McCartney with a layout using Beatles' or Wings' songs for our title/journalling. Sir McCartney will be performing at the closing ceremonies of the Olympics.

Here's my design:
I adored the grey wood grain of this back ground paper. It's is distressed and has a bit of this warm tangerine colour smudged on it. I love that I didn't have to do that for myself!

I fussy cut flowers from the "Radiant" patterned paper and butterflies from the "Relaxed" paper. After inking the edges I strung them together in a floral banner under my focal photo. The base for my 'banner' is two colours of floss.
I wanted to add some colour and dimension to those beautiful flowers so I dug out my old mini beads and glued them in the centres. I even left a few to trail off on the lower right too.
The final touches included some old vintage looking lace from Recollections and a bit of burlap. The sparkly shape is half an letter 'o'.

I hope you will pop by the Authentique blog and the Two Scrapbook Friends Forum to see these great challenges. Until next time, keep doing what you love.
Christa

Authentique Supply List
Carefree Collection
  • Radiant
  • Relaxed
  • Content
  • Calm
  • Jovial
  • Easygoing

Saturday, July 28, 2012

TSF Olympic Challenge #1: 24 Hour Sprint Sketch Challenge


I am excited to be your official Two Scrapbook Friends' official Olympic Games correspondent and beginning today we will be issuing a new challenge almost every day! There will be games and prizes to be won, so I hope you will join us and play along for the next two weeks!

Our first challenge is a 24 hour Sprint Sketch Challenge. I have been busy all week teasing our friends by providing clues to help them complete their design. Everyone has exactly 24 hours to complete their design, photograph it and get it uploaded to the forum and the gallery at Two Scrapbook Friends; all by 8:00pm on Sunday, July 29. A random winner will be announced in the forum and on our blog, on Monday, July 30th.

Also, be sure you have used all the elements in the clues provided this week:

1. a larger photo (mine is 5.5 x 5.5)
2. a banner
3. hand or machine stitching
4. a little bit (or a lot) of red and white

With the rules out of the way...On your marks, get set...GO!!!!!

Here's the sketch:


Here's an example I made for inspiration. I chose this photo of my children at my hubby's birthday a few weeks ago. I chose it and the the title "So Happy Together" because at the Olympic Games many families will come together to celebrate this once in a lifetime opportunity.


I will give each person an extra entry whose design reflects a CELEBRATION of some kind. I hope you will play along and stop in to see our creations.
Until next time, keep doing what you love.
Christa


Monday, July 23, 2012

Sharing my Summer Soul Brag Book

Good Morning Friends! I am excited to share with you my Fancy Pants Brag Book creation. The Fancy Pants Brag book is has so many possibilities, I must admit to being a bit overwhelmed (and so very excited) at where to start! Each Brag Book comes with papers of two sizes and two sheets of stickers, letters, and tabs. There are three varieties, and I was lucky enough to be given Summer Soul to work with.
I decided to create a family travel journal where I could write about out adventures at the Cottage last summer and add to it as we had more adventures!
I made the cover with some of those great Summer Soul papers and the added the month stickers from the sticker sheet. One of things I love about these brag books is the kraft paper is super durable.
This is the title page for the Cottage vacation we took. My plan is to add a new title page for each journey we take.
I also love that each page doesn't have to be a masterpiece it just needs to express the fun we have with photos and journalling.
 I used some masking tape and made some clouds with inks and mists.(Thank you Michelle Hernandez!) I also used my Silhouette to cut my sunshine.
The banner made using some of those really cute stickers from the included sticker sheets and washi tape.
I also wanted to include lots of writing too so I could recall some of the specifics. For our next vacation I will take the book with me and do my writing while I am there so it is fresh, and just leave room for photos.
I liked too, that some of the pages had pre-printed set of lines for writing and a white flourish  in the upper corners.
Fancy Pants has also included several plastic pages to just insert photos if  you have more than one of a certain event. This is my dolly trying her hand at kayaking for the first time. I included some hand drawn flourishes and fussy cut a "surf babe" title card from the paper included.
There is also a pocket page to save all those little bits of memorabilia you love. Here I included a little note of welcome from our hostess. I plan to save more of my 'stuff' on vacations so I can look back and remember the cost of dinner or the tickets to special events.

I highly recommend this experience. It is so different from my usual scrapbooking one where I labour over every page. This came together so easily once I gave my self up to preserving the memories. I am excited about continuing the creative process here..now, if only I could get it back from Carolyn at the store!

Until next time, keep doing what you love.
Christa

Thursday, July 19, 2012

Let the 3D Sunshine in with Momenta

Good Morning Momenta Fans, Christa here to share with you a technique to put a bit more sunshine into your summer projects. My scrappy pal Avril Tanner, shared this technique with me last summer and I wanted to let you in on this great little idea! What's even better is that you can turn these shapes into just about anything!

Here's what you will need:


- a diecut or sticker sunshine big enough to support your circle punch
- a circle punch (or if you choose, have your die cut machine create your circles too)
- bone folder
-a great liquid glue
- some sunny matching patterned paper (I chose a really sweet yellow polka dot from the Family Outings pack PA-2250)


Let's begin!

Step 1: Punch or cut six circles of the same size.


Step 2: Using your bone folder, fold and press the circles down the centre.


Step 3: Glue one half of the circle to one half of another circle and repeat this FIVE more times.


Step 4: Glue the 'six circles' to the sun diecut and you are DONE.

Use your new 3D sunshine on those summer projects to add dimension and texture. That's what I hoped to acheive on this layout I made:

I also made a clean and simple card by using this shape to make pumpkins...and Fall is right around the corner!


I hope you will give this technique a try and until next time, keep doing what you love!
Christa


Momenta Supplies:
Family Outings (PA-2250)
Super Pad (PA-2263)
Cardstock Pad (PA-2337)
Premium Paper Pad Fall (PA-2331) 


Additional Supplies:
Cork
Thread
Paper Clips
Water Colour Paint
Buttons


Sunday, July 15, 2012

Inspiration Elevator #3: Exploring the Double Page

You may recall from last month's challenge that the purpose of this challenge group was to take our scrapbooking to the next level, to stretch our creative process and to grow as artists by embracing challenges that make us think, work and grow. 


This month our challenger was the very talented Audrey Yeager. Audrey noticed (as you may have too) that all but one of our members is a single page designer. Our default design is a single 12x12 design! That's why we love IE..so many styles and we all approach it differently! In fact, we have invited a valued guest designer to join us this month; her name is Scarlett Salamone.

Here's a bit of what Audrey had to say in her challenge this month. She even gives us a few tips and a link to a great blog for inspiration! 

" I take a lot of photos.  Right now, I have been using 2 or 3 smaller photos on my layouts.  But truth is, I have a lot of events where I would like to include a lot of photos on a larger spread so that you can see the details in the photos to.  So I print out the photos with the intention of putting them on a 2-page spread...
I just can’t get it.  I feel like I have a certain style, yet when I sit down to create a 2 pager, it feels nothing like “me”. 
SOOOO, your next challenge is to create a double page layout.  And I don’t mean just any double page.  I want you to really think about your style and your design practices for single pagers (the first assignment helped us define our style, so think about those elements).  Then take those ideas and try to apply them to a double pager.   
Here are some ideas:
*Start by thinking of your canvas as a 12x24” size.  Before you even print photos or pick papers, try to envision (or sketch out) a design that feels like “you”.
*Once you have a basic design, think about the techniques that you love and where/how you will incorporate them on your page.
*Choose products that you would use for a single page layout.  If you use white cardstock as a base a lot of times, then use it on your double page.  If you mostly use patterned paper, then use that.  And if you don’t have 2 of the same sheets of patterned paper for your background, I REALLY challenge you to use 2 different 12x12 sheets for the base of your spread!  (Kim Watson does a superb job of using 2 different sheets for her backgrounds…if you have CK magazine, look at some of her pages.) http://kj-starre.blogspot.com/
*Another way to approach this, (which I personally want to experiment with more), is to create 2 single pagers, but use the same papers in the same ratios.  The papers and the photos will help tie your design together.
You might do this challenge and not be happy with your first result, so I challenge you to KEEP TRYING!  Do a 2nd , double page layout and try to learn from your “mistakes” on the first one.
Also, if you typically DO create 2 pagers, then apply the same ideas to a single page spread instead.
As we create this month, if you have thoughts about your process or are struggling, OR you are loving what you are creating, share some of your ideas with us!!!
I can’t wait to see what you create!"

 I admit it, since I have been seriously scrapbooking, I have taken to creating single pages. I struggle, as Audrey says, to make a double page design seem like"ME". In fact, I cursed my dear friend Audrey several times during this process and it took me ages. AGES, I tell you.
I struggled. I tried this and that and changed it over and over. I even debated in settling..to go..old school and just LIVE with it already. But that didn't seem to be the goal of this Inspiration Elevator idea. I wanted growth, darn it. Even if it killed me!

 So, insert more cursing ...then I did what every other woman does when things aren't going her way: I complained loudly to my friends and they came to my rescue with encouragement and ideas! Audrey suggested I look at my single page designs and make a list of commonalities. I did that and then compared it to what I had created, guess what? There were elements missing!
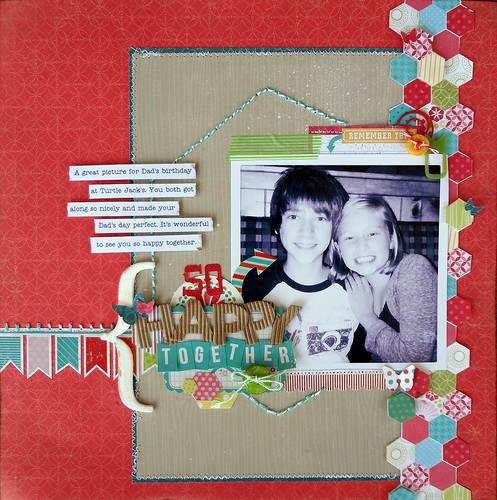
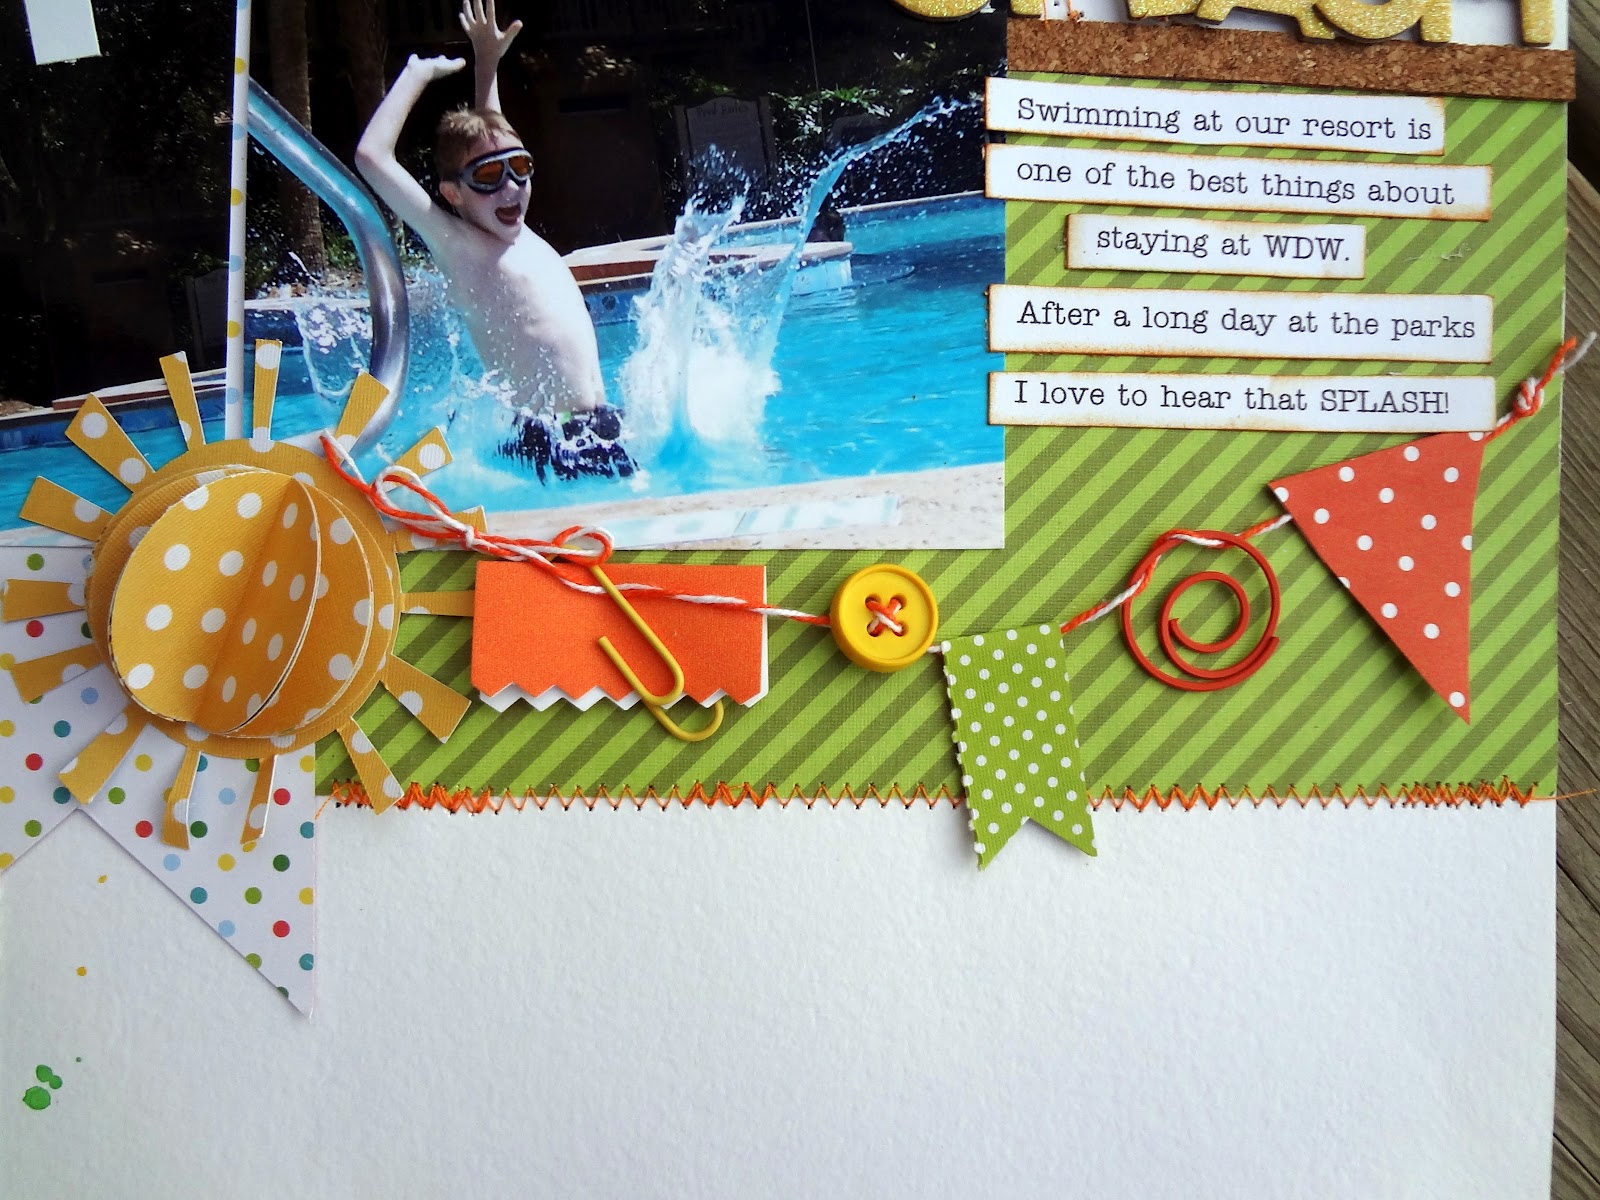
Here's what I ended up with and I must admit to being pleasantly surprised with the end result. It has all the "Christa" elements:
  1. Paint
  2. Trims
  3. Buttons
  4. A large photo
  5. A multi font title
  6. Machine Stitching

The colour palette here comes from the photos and the papers are a mix of Jillybean, MME, and Bo Bunny from my stash. I am especially fond of my hand stitched Mickey Mouse head that frames up my title. While I usually don't hand stitch I have been know to have a large element peek out from the side of my layers.
I also added a few buttons and what my BFF , Ann likes to call a "confetti" array. It is made of cork bits and a few flower brads. I placed a matching (balancing) array in the other left corner.
I finally added my strip journaling to finish things off.
A final look at the finished project:
I am not sure I am in love with it, but I think I like it well enough to post it here and maybe keep giving this process a try. I can't thank Audrey enough for her encouragement and for this truly challenging challenge.

I hope you will stop by and see what the designers on this adventure have created:

Scarlett Salamone - July Guest Designer 

I invite you to play along with any of our challenges. You can see the first two challenges: #1 is here and #2 is here. We would love to see what you are inspired to create. Add your comment below with a link, I will be sure to drop by and say hello.

Until next time, keep doing what you love to do.
Christa


Wednesday, July 11, 2012

"Beautiful" and a Sketch for Two Scrapbook Friends

Good Morning! I am happy to share with a sketch I designed for Two Scrapbook Friends! For those of you who have been with me a while, may heard me say that I usually don't work from a sketch as a rule. I prefer to let the photos speak to me (fluffy, eh?) and so when I am asked to create a sketch I usually scrap first and sketch last!  This sketch arose from a piece of patterned paper. My Little Yellow Bicycle created this great paper and when I was searching for papers to match my little pics, I discovered this one. The photos just fell into their little spots on the page..oooooo...ahhhh...so magical!

I added lots of stitch-y bits and buttons and a few pennant pieces (which cover a few text highlights) for anchors and flow. Some washi tape and gems too.


Overall I like the design, but when I created the corresponding sketch..well.it seemed a bit..SPARSE.  Lots of potential but a challenge for sure!


Sooooooooooooooooo, if you decide to play along be sure to add your own little bits to anchor your design and create flow. I'd love to see what you create. Just pop into Two Scrapbook Friends forum and say "Hello".

Until next time, keep doing what you love,
Christa

Monday, July 9, 2012

So Original

Good Morning Momenta fans! Today, I wanted share with you a design I made celebrating my son and all his originality! And what better way to celebrate his originality than to use the new metal embellishments from Momenta; an amazing, original and creative idea!

I began with a sheet of white cardstock and splattered multi coloured water colours to match my patterened paper choices. I chose Candy Blossom's 5x7 pad which might be considered a bit feminine but there are so many colourful choices it's not hard to create something for any occasion.

After mounting my photos on white and a pop of black, I tied some twine around my photo and added bits of washi tape to the sides.
The final bits of genius are these wonderful metal hearts. The new metal line from Momenta gives you hundreds of options to accent your pages. They give your designs a little bit of 'genius'.


I hope you will find the new metal at your local store! They are so reasonable and a great addition to any page.

Until next time, keep doing what you love to do,
Christa

Momenta Supply List
Candy Blossom (PA-1070)
Metal Hearts (ST-5699)

Saturday, July 7, 2012

Cute as a Button..garland, that is!

I wanted to share a little design I made using Simple Stories Summer Fresh line. I love Simple Stories as a rule, and this line is no different. It has burlap and denim elements (which I find super inspiring) as well as lots of greens, reds, yellows and blues.

This design features a photo of my daughter (which she disliked and says makes her cute nose look huge; NOT!) But I love it because her cheeks are rosy and her smile is sweet. I want to remember these young features when she has grown up.


I used a piece of patterned paper that had a large chevron on it and fussy cut it out. I machine stitched the top and bottom in black thread.  I also used some white paint to provide a visual highlight for my small cluster in the upper right and lower right. I cut a large flower from burlap and layered a Prima flower with a bright yellow button.


But what I love the most is my button garland! I used thin twine and threaded each button and spool on to it. That great flower button is courtesy of Close to My Heart. I used a bit of glue to tack it down only a few places just so it 'flowed' along the twine a bit more.

I hope you will give this button garland idea a try! Until next time, keep doing what you love to do.
Christa

Monday, July 2, 2012

Heart and Soul in under an Hour

In the old days (as my daughter likes to call them) when cameras weren't digital, I took a few random black and white film (yes, film!) photos of my son. He will soon be 13 years old and when I see these sweet baby shots of him, I actually tear up (don't mock me!) They are originals and can't be replaced so I usually take extra care in scrapbooking them. This month the Lipstick Chicks were challenged to create a design in an hour.  I wouldn't normally choose one of my precious photos to create in an HOUR but, when I am moved to scrap it I gotta go with the flow!  It actually turned out just the way I imagined and whether it was an hour or four (yes sometimes layouts take four hours!), I am pleased to have it in his album for years to come.

So here it is; the precious picture and all it's 43 minute glory! That includes the choosing of papers, pictures, misting, drying, sewing, sanding, cutting, inking and adhering!

I chose Simple Stories Summer fresh line and used a subtle pattern for the background. The chevron piece is also from that line. I used Mr. Huey mist in a brown colour and misted in the upper right. Sensitive to my hour limit I used my heat tool to dry the mist! I am not a fan of dry time! I added a burlap heart some washi and a few twine hand stitches.
I wanted to use a play on words for my title since my cutie is chewing on his shoes. I really do love him heart and soul! I chose several fonts for my title and wanted the emphasis to fall on the heart and soul part. My red chipboard letters are sanded and inked.  My 'heart' scrabble letters were actually purchased to make a "Father's" card and when I looked  at them sitting on my desk,  they suddenly made the word HEART (minus the f)! It was a magical scrappy moment.
I loved this challenge. I think scrapping in this short time period really distills your style and preferences down to the ultimate essence of YOU. Please stop by the True XOXO blog and check out what my fellow designers have created. Maybe you'll play along too! I hope you like it and until next time, keep doing what you love!
Christa

Another Fresh Card:

Good Morning! Another small post from my DT kit at Two Scrapbook Friends using Authentique's Fresh paper line. I love it's reds and baby blues and the sea motif of sand dollars, and retro images really lends itself to a nostalgic feeling creation. I used a Harmonie chipboard piece and a red button to add focus and sharpness to the design. Of course, more stitching and red twine.

I used washi tape as the background here.Don't you love the gingham check? I know I do!
Until next time, keep doing what you love to do!
Christa

Supply List
Authentique Fresh Details stickers,  Light and Pure papers